
Contents
The bottom line
- Cornell Notes are a powerful note-taking method because they create a natural learning cycle within a single document.
- By reducing, reciting, reflecting, and reviewing your notes, you can ensure high levels of retention and memorization.
- Combine Cornell note-taking with active recall and spaced repetition to fully optimize your studying practices.
It’s no coincidence that the Cornell note-taking method has not only survived but even thrived for nearly a century by now. This method is very effective and one of the most versatile and straightforward to use out of all the note-taking styles I have covered.
In this guide, you’ll learn how to take effective Cornell Notes in five simple steps:
- Record your notes in columns
- Reduce your notes
- Recite from memory
- Reflect on the material
- Review your notes
But before getting to that, let’s cover the basics.
What are Cornell notes?
The Cornell note-taking method was first developed by Walter Pauk, director of Cornell University’s Reading and Study Skills Center. Walter Pauk started advocating for the Cornell note-taking system in his book “How to Study in College” in 1962 (currently on its 11th edition). Since then, the technique has become a milestone in note-taking and extends far beyond the Cornell campus.
Put simply, the Cornell note-taking method involves dividing a note paper into three unequal sections: a cue/questions column, a note column, and a summary area. This is similar to the split-page note-taking method, but is both more specific in its format and adds additional guidance for how to approach the note-taking.
The format of the Cornell notes helps your brain better understand and retain information. Furthermore, the Cornell system can be used for nearly all mediums of instruction, including physical lectures, live online lectures, recorded online classes, and textbooks.
The method is flexible enough to suit just about any context as long as you follow the fundamental principles highlighted in this article. Also, here’s a short video about Cornell Notes from Cornell’s Learning Strategies Center (LSC) if you’d like to see some material straight from the source.
Before we get into the step-by-step process of the Cornell note-taking method, let’s examine some data from students enrolled in Cornell’s free “Note-Taking Strategies” course module.
As part of the course module, students are asked how they use their notes post-lecture and how they wish they were using them. You’ll notice some stark differences between the two answers.
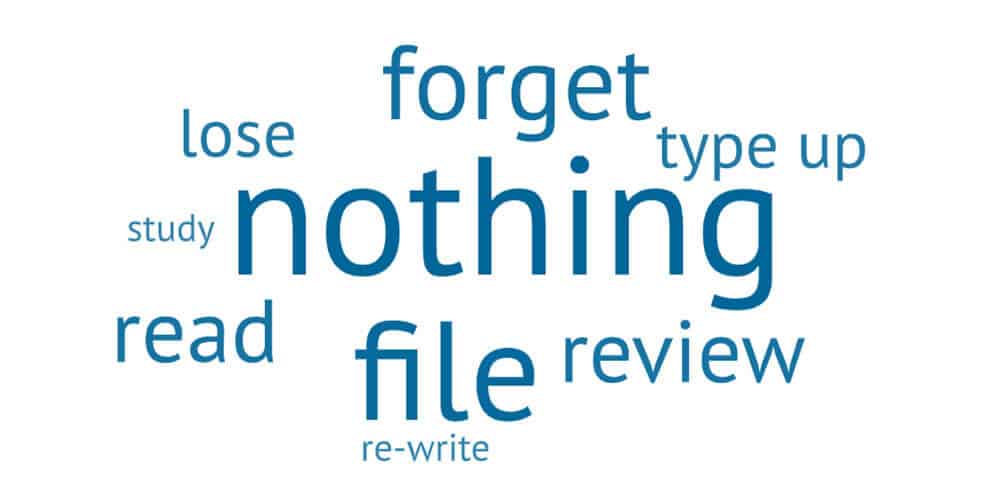
Here are the most common words students use to describe what they do with their notes:
And, here are the most common words students use to describe what they want to do with their notes:

The students’ hearts are in the right place – studying your notes certainly is better than throwing them in the bin.
However, it’s evident from this module that even Cornell students do mostly nothing with their lecture notes. That is despite effective note-taking being positively correlated with learning achievement time and time again.
Oh, the secret joys of schadenfreude. If you’re one of the select few students able to learn how to execute the Cornell method, you can reap the rewards and stay ahead of the curve. All the while, the majority of students are doing nothing at all with their notes.
The only downside? You might need a personal assistant to handle all the students asking for your notes.
Scientific studies on the effectiveness of Cornell Notes
In general, effective note-taking has been proven by researchers to help achieve student learning outcomes. Many studies have confirmed this finding, including a 2014 study, where researchers Joseph R. Boyle and Gina Forchelli found that the highest-achieving students were efficient note-takers.
However, these studies were designed to evaluate note-taking in general. There is surprisingly little research on the efficacy of the Cornell system. And the studies that have been done have not always strongly supported its effectiveness.
For example, in a 2012 study conducted in a high school family and consumer sciences class, students were asked to take Cornell notes. Some students reportedly had strong feelings of rejection towards the system, and no positive impact could be identified from the Cornell system of taking notes.
But there have been some positive findings also. A 2019 study conducted in Egypt concluded that Cornell note-taking (and REAP) had a significant positive effect on the critical reading skills of EFL secondary school students.
For the time being, there is no general scientific consensus on the efficacy of Cornell note-taking.
However, it’s worth mentioning that note-taking is notoriously tricky to measure. Researchers can ask test participants to take Cornell-style notes to assess their recording skills, but assessing the efficacy of reciting, reviewing, and reflecting is far more difficult. And those steps are some of the most crucial in the Cornell note-taking system.
Now that we’re done with the theory, let’s skip to the basic practical considerations: different options for acquiring Cornell-style papers.
Creating (vs. buying) Cornell Note papers
Before going to lecture and getting into the nitty-gritty of Cornell note-taking, you first need some Cornell note papers.
There are two ways to go about acquiring some of those ever-so-scarce Cornell note papers:
Creating your own Cornell Note papers
Taking the hands-on approach?
That’s awesome – there are many excellent reasons to skip Amazon and go with DIY Cornell Notes:
- Cost savings. The extra cost of buying premade Cornell notes will add up rather quickly as an active student. If you master the Cornell method, you will be going through hundreds of these notes within a semester, and having to pay up to $0.25 per paper as a student can be miserable. While time-consuming, creating your own Cornell note papers can save you a few dollars.
- Customization opportunities. I will teach you two common templates for Cornell note papers in the next section. It’s up to you to choose and decide which works better for you. In fact, there are dozens, if not hundreds, of templates people use for their Cornell notes. If you rely entirely on premade Cornell papers, you may be out of luck if you don’t like the templates available.
- Intimacy. While this benefit is difficult to quantify, it’s a benefit regardless (at least for me). I find that when I create my own Cornell papers by hand, I feel a deeper connection with the notes. Having prepared everything by hand, I feel compelled to utilize all the notes I’ve written. After all – why would I waste all that grueling preparation?
Now, let’s go over the line-drawing process. It’s straightforward, but it’ll likely take a few tries for you to become quick and efficient at the process. There are a lot of straight lines to draw, so invest in a good ruler.
In this guide, we’ll be using the proportions that Walter Pauk himself taught in the 1950s. In particular, we’ll get our details from his book “How to Study in College. ” Scientific literature also tends to use these note-taking column proportions, so we’ll be going with that.
To begin, draw a vertical line on the left side of the paper. It should be between 2.25″ (6 cm) and 2.5″ (6.35 cm) from the left edge and 2″ (5 cm) from the bottom edge of the paper.
It should look something like this:

The column created on the left side is called the Cue Column and the right-hand side column is called the Note Column.
Next, draw a horizontal line across the width of the page like this:

The final section at the bottom is called the Summary Section. I’ll be explaining its purpose in the “How to take Cornell Notes” section of this article.
Buying premade Cornell-style paper
Creating your Cornell notes by hand is not difficult, but it’s not for everyone. That is why some buy Cornell-style notepaper from the get-go, bypassing the line drawing altogether.
Here are some advantages of premade Cornell notes:
- Timesaving. Creating a single sheet takes me around 30 seconds, so for a pack of 50 note paper, that’s 25 minutes of time savings. This is time that can be spent more productively than line drawing and punching binder holes. In fact, that’s just enough time to watch one episode of The Office.
- Consistent columns. If you draw the column lines by hand, you’ll always end up with slight differences in sizes. Not a major issue, but I know many of you love your A-E-S-T-H-E-T-I-C-S, and wonky lines can ruin the aesthetics of your notes.
- Pre-punched holes. Unless you like having large stacks of notes around your home, you will need a binder (I use a ring binder) for your Cornell notes. And binders need holes to attach to. If you take this task upon yourself, you’ll have punched hundreds, if not thousands, of holes into paper sheets by the time you’re ready for your semester (although I am very fond of my hole punch). Premade Cornell notes, on the other hand, tend to take care of that as they usually come pre-punched with holes.
If you’re looking to buy premade Cornell notes, you can order them from Amazon – or check your local office supply store.
Now, it’s about time to get into the steps needed to take Cornell notes.
How to take Cornell Notes
The five steps of taking Cornell Notes are called the “five Rs”:
- Record your notes in columns
- Reduce your notes
- Recite from memory
- Reflect on the material
- Review your notes
Record your notes in columns
Now that you have your Cornell Notes ready and the information flows in from the lecturer (or textbook), it’s time to start recording your notes.
At first, you’ll start writing into the wider Note Column. This is the primary column where you’ll be writing down all the main notes from the lecture. Helpful notes record the important details and the general gist of what the professor is saying.
In the Note Column, to save time and get the best notes possible, you’ll want to use short “telegraphic sentences.” Telegraphic sentences leave out unnecessary words, such as articles, and they utilize abbreviations. This is done to turn long chunks of information into small, bite-sized pieces that are easier to analyze later.
Depending on the topic, you might also want to add drawings or diagrams to the Note Column. These can help summarize information that is otherwise difficult to put into words.
In addition, consider using bullet points, underlines, and lists in the Note Column. These can be helpful in the reduction of your notes later on, and they will make the notes more skimmable.
The notes you are recording here are the basis for all the following steps. That is why it’s crucial that you come into lectures prepared and ready to start recording.
Reduce your notes
Typically, you’ll start filling the Cue Column after the Note Column. That is because the Cue Column is designed to act as a method of note reduction. While the Note Column will be full of information, the Cue Column is meant to contain only a tiny fraction of that.
Most commonly, the cue column is used to formulate questions about the Note Column. After recording notes in the Note Column, you should review what you wrote as soon as possible. Otherwise, you might forget the context behind the initial notes that you took.
Reviewing the Note Column will allow you to get the gist of the text, and based on this, you can formulate relevant questions. To form questions, think of the notes in the Note Column as a set of answers. What question might these notes be the answer to? Write that in the Cue Column next to the relevant note.
It’s worth mentioning that it’s not always necessary to do this step after the lecture. According to Cornell’s LSC, filling the cue column while taking notes can help your brain stay active and engaged while boosting memorization. The LSC also recommends writing in-progress ideas into the cue column and making updates later if needed.
Once you have filled the Cue Column, it’s time to summarize all that information. At the bottom, Cornell Notes always include a summary area, and this section is used to summarize all the most critical points discussed on the page in a couple of sentences.
These steps will help you reduce your notes step-by-step, resulting in smaller, content-packed chunks of information rather than long lines of text similar to a textbook.
Recite from memory
Now that you’ve recorded and reduced your notes, it’s time to start memorizing them. For recitation and memorization, I like to use a technique explained by Dave Ellis in his book “Becoming a Master Student. “
Cover the right-hand column (the Note Column) and leave only the Cue Column visible. Now, view the questions you wrote in the Cue Column and try to answer each of them. Try to do so with as much additional context and information as possible.
After reciting all the answers, uncover the Note Column and check your answers. Did you manage to repeat the answers from memory?
If it felt too easy, you might want to take more detailed notes in the Note Column. Provide additional context, add drawings – anything that seems relevant to the question.
If the answers were too difficult to recite from memory, then keep retrying until you’ve gotten at least the gist of the answers down. Going through relevant textbooks or video materials can also help you formulate answers if you find your Note Column lacking in content.
Reflect on the material
The reflection stage is perhaps one of the most helpful elements of the Cornell note-taking method.
Reflection always happens post-lecture after you’ve had time to recite your notes. Based on the successes or failures of the reciting stage, try to think in a self-critical way.
Ask yourself:
- Which topics did I already understand well?
- Which topics need further work?
Based on what lecture topics you’re the strongest or weakest at, start targeting those aspects which require further study. Add further notes into the Note Column, find additional learning materials, and create new summaries – all this is a part of the reflection process.
Review your notes
Once you’ve gone through all the previous steps, it’s time to repeat the process whenever needed.
If a test is upcoming, you’ll want to review and recite the notes from memory a few more times.
If a new lecture is expanding on the topic, you’ll want to review your notes to ensure that you have a solid grasp of the previous lecture’s material.
Repetition is one of the best ways to increase retention, and it’s a step that should not be neglected. Reviewing your notes during strategic moments means you don’t have to rely on cramming or a “good memory.” As long as your note-taking methods are solid, you can master any topic.
Everyone has their way of applying Cornell note-taking to their learning style. You’ll likely end up adapting the Cornell note-taking to suit your personal learning style better. There’s no better note-taking strategy than one you have grown and developed yourself. Take that into consideration when applying the guidelines set out in this article to your studies.
Read Next


Originally published January 16, 2023